
您如何安装UPS架子?
所以, 您有一个不间断的机架电源 (UPS) 而且您已经准备好安装它. 查看服务器架, UPS, 栏杆和螺丝袋有时会感到有些艰巨. “安装UPS架子" - 或更准确, 安装一个机架式UPS 进入 设备架 - 需要一些计划和护理, 但这绝对可以管理. 我们将指导您完成安全和专业设置的一般过程.
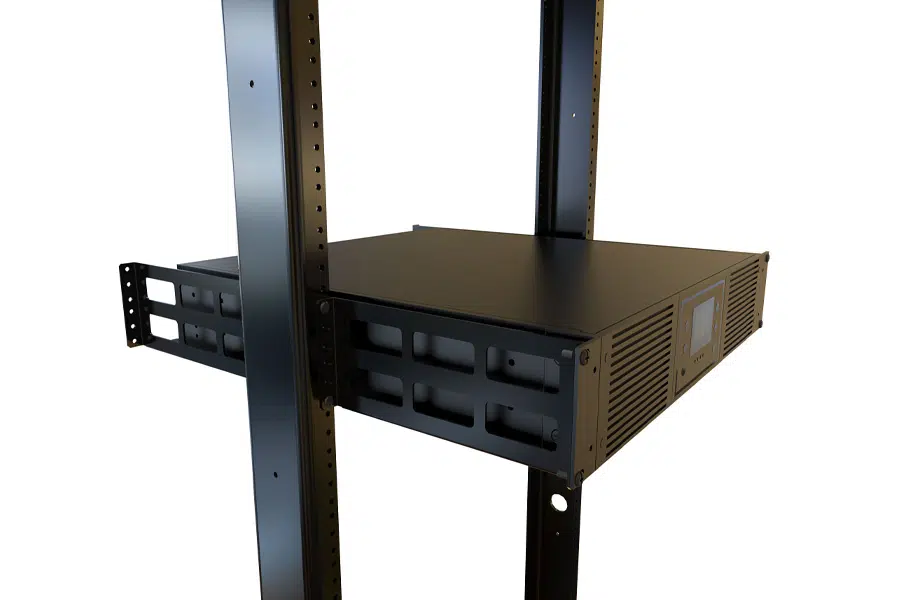
安装架子安装通常涉及首先准备19英寸设备架, 确保稳定 (理想地锚定). 然后, 您将安装UPS随附的铁路套件 (或兼容的) 到机架的垂直柱, 确保与您的机架类型匹配 (2-帖子或, 更常见的是UPS单元, 4-邮政). 下一个, 您小心地滑动并将UPS单元提升到这些轨道上, 用螺钉将其固定到位, 最后, 连接您的电源和负载电缆. 安全, 仔细测量, 通常,一对额外的双手用于较重的单位是平稳安装的关键.
尽管 吉克斯太阳能 主要专注于利用太阳能和大规模电池存储, 我们了解所有支持设备的可靠性至关重要. 无论是适合您的IT装备的UPS还是能量系统的关键监控组件, 适当的安装是基本的. 让我们分解过程和相关问题.
您如何设置架子安装?
设置“架子安装" - 那是, 在设备架上组织和安装设备, 尤其是在包括ups时 - 不仅仅是填充空间. 周到的设置可确保安全, 效率, 易于访问, 和所有装备的最佳性能.
精心计划的机架设置涉及几个关键步骤: 计划布局 您所有的设备 (将较重的物品(例如UPS)放在底部以保持稳定性), 确保 足够的气流 用于冷却, 精心 电缆管理 为了整洁和安全, 清楚地 标记所有组件 和连接, 并仔细考虑 配电 从UPS到机架内的其他设备.

深入潜水: 机架设置的最佳实践
这是实现最佳机架设置的更详细的外观, 特别是当涉及UPS时:
- 计划您的布局: 在您开始安装任何内容之前, 勾勒出每件设备的去向.
- 重量分布: 始终放置最重的物品, 像UPS单元和大型服务器, 在架子的底部. 这降低了重心,并防止架子变得高度且不稳定 (施耐德电气的APC, 伊顿).
- 空气流动: 了解设备的气流模式 (通常用于机架齿轮的前到前后). 确保凉爽的空气可以到达入口,并可以有效地耗尽热空气. 不要阻止通风口.
- 间距: 如果可能, 或使用空白面板填充空的U空间以保持适当的气流路径.
- 安装UPS (和其他重型装备) 第一的: 从自下而上开始. 这使得架子在工作时更稳定.
- 电缆管理是关键:
- 路由电源电缆与数据电缆分开以最大程度地减少干扰.
- 使用魔术贴带或电缆扎带 (松散, 避免捏) 整齐的电缆包装.
- 利用架子侧面的垂直有线经理以及设备之间的水平管理器.
- 留出足够的休闲设备 (例如, 将服务器滑出其导轨) 但不是太多了,它会造成纠结的混乱.
- 电力调配:
- 将关键设备连接到UPS媒体.
- 对于带有许多设备的机架, 使用机架标准配电单元 (pdus) 由UPS喂养. PDU在方便的条带中提供多个插座. 有些是基本的, 而”聪明" 或“管理" PDU提供远程插座控制和电源监控.
- 标记一切: 清楚标记每件设备, 每个端口, 和两端的每根电缆. 这将节省您在故障排除或升级期间的巨大时间和挫败感.
- 确保架子本身的足够通风: 房间或壁橱内容纳架子需要适当的通风或冷却以消散所有设备产生的热量, 包括UPS.
您如何锚定电架?
如果您的“电源架”" (设备架) 要容纳诸如服务器的重型物品, 特别是一个或多个UPS单元, 确保其稳定并且不会小费对于安全和设备保护绝对至关重要. 这是锚定的地方.
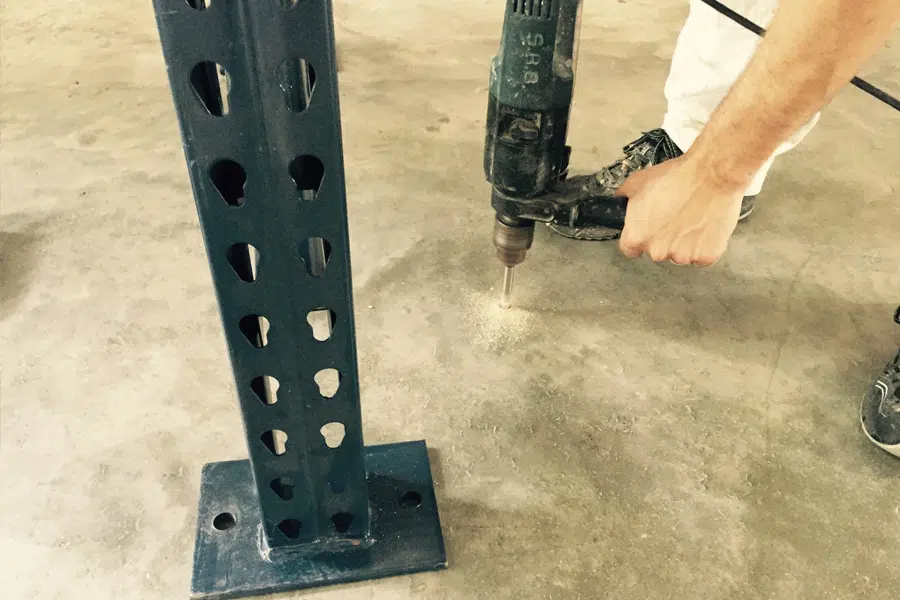
锚定设备架通常涉及 将其牢固地固定在地板上 (最常见的是重载重量的4柱架子) 和/或将其连接到稳定的墙壁上. 特定方法和硬件取决于地板的类型 (例如, 具体的, 木头), 机架将保持的设备的重量, 和本地建筑法规, 特别是在容易进行地震活动的地区. 对于重型UPS单元, 强烈建议将地板锚定固定以防止架子倾倒的任何机会.
深入潜水: 确保机架稳定性
这就是为什么以及如何锚定设备架:
- 为什么要锚?
- 安全: 这是主要原因. 装满重型服务器和UPS单元的架子很容易重量, 如果不是数千, 磅. 小费会造成严重伤害和灾难性设备损害.
- 稳定: 锚定防止架子移动或摇摆, 特别是安装或维修重件时.
- 地震合规性: 在易于地震的地区, 建筑法规通常要求设备架的地震锚定,以防止其在地震期间掉落.
- 锚定方法:
- 地板锚定 (最常见的是重架):
- 混凝土地板: 这通常涉及将孔钻入混凝土板上并使用重型混凝土锚螺栓 (像楔形锚, 袖子锚, 或环氧锚) 穿过机架的底板.
- 木地板: 滞后螺栓可用于将架子固定到地板托梁或实木地板. 可能需要用底板扩散负载.
- 墙锚: 架子的顶部或侧面可以使用适当的支架和硬件固定在墙螺柱或固体砌体墙上. 除了固定较高的架子或额外稳定性的地板外,通常还可以做到这一点.
- 防尖腿/脚: 有些架子带有可扩展的脚或托架,旨在增加足迹并防止小费, 但是对于非常重的负载,例如多个UPS单元, 这些通常是不够的,应该通过适当的锚定来补充.
- 地板锚定 (最常见的是重架):
- 考虑因素:
- 体重能力: 确保您的机架本身为您计划安装的设备的总重量进行评分.
- 专业帮助: 如果您要处理极重的负担, 复杂的装置, 或不确定结构要求, 最好咨询合格的结构工程师或专业机架安装程序.
正确固定架子是您甚至考虑在那个沉重的上滑动之前的基本步骤. 安全第一!
机架安装如何工作?
机架安装背后的实际机制是什么? 各种各样的设备如何 - 服务器, 网络开关, 补丁面板, 和UPS单元 - 非常整洁且牢固地融合到那些高大的金属框架中? 这一切都归结为一套聪明且广泛采用的行业标准.
架子安装可以使用 标准化的19英寸宽框架 (设备架) 具有垂直安装轨,带有规则间隔的孔. 为机架安装设计的设备具有前面板 19 英寸宽,包括安装法兰或耳朵,带有与架子轨道上的孔对齐的孔. 当时设备 用螺钉或笼螺母和螺栓组合将其固定在这些轨道上. 对于服务器和大多数UPS单元,例如服务器和更深的设备, 使用铁轨套件; 这些附着在机架的垂直帖子上 (前后4杆架子) 并为设备滑入并承担重量的设备提供架子状的支撑.

深入潜水: EIA-310标准及其组件
架子安装的魔力很大程度上要归功于EIA-310标准, 定义这些关键要素:
- 19-英寸标准宽度: 这是指设备前安装面板的宽度. 设备的实际机箱适合稍微较窄 之间 架子的垂直安装导轨.
- 机架单元 (你): 机架安装设备的高度在“ U" 单位, 在哪里 1u = 1.75 英寸 (44.45 毫米). 设备通常为1U, 2你, 3你, ETC。, 高的. 这样可以精确规划多少齿轮可以安装到机架中.
- 垂直安装导轨 (帖子):
- 2-帖子架 (电信架): 有两个位置的垂直柱. 通常用于较轻的设备,例如补丁面板和某些网络开关. 通常不适合深度或重型单元.
- 4-帖子架 (服务器架/机柜): 有四个垂直职位 (两个在前面, 后方两个). 这些对于支持服务器和大多数机架UPS单元(例如服务器和大多数Rack -Mounts单元)至关重要, 提供稳定的四点安装.
- 安装孔: 垂直导轨有用于连接设备的孔. 这些可以:
- 方孔: 在现代服务器架上常见. 他们需要 笼螺母, 夹在方孔中以提供螺钉的螺纹孔.
- 圆孔 (未读取): 需要坚果和螺栓.
- 圆孔 (螺纹): 现在不太常见, 但是,允许将螺钉直接螺纹到轨道上 (例如, 10-32, 12-24, 或M6线程).
- 铁路套件: 这些对于大多数服务器和UPS单元至关重要.
- 固定导轨 (或货架轨): 提供简单的架子或固定的安装点.
- 滑轨: 允许将设备从机架上拉出 (像抽屉) 为了更轻松地访问和维修,而无需完全删除它. 大多数服务器和许多UPS单元都使用滑轨.
- 铁路套件必须与设备和特定类型和架子的深度兼容.
该标准化系统允许许多不同制造商的设备整齐地集成到同一机架中, 这是非常有效的.
架子安装的UPS和Tower Ups有什么区别?
当您购买不间断的电源时, 您会很快注意到两种主要的物理样式: “架子安装" 和“塔。" 这些究竟将这些与众不同, 你怎么知道哪一个适合您的需求? 它主要取决于他们的物理设计以及打算安装的地方.
主要区别是他们 表格和预期部署. 架子安装的UPS单元 设计为相对平坦 (19 英寸) 水平安装到标准设备架上, 通常由铁轨固定. 塔UPS单元 是独立的, 直立的设备, 外观类似于小型台式计算机塔, 设计用于坐在地板上或它们保护的设备旁边的桌子上. 在功能上, 两种类型都可以提供相似水平的功率保护 (例如, 支持, 线路相互作用, 或在线双转换技术) 和类似的能力, 但是他们的身体形状决定了他们最好的用例.

深入潜水: 选择正确的外形
让我们在几点上比较它们:
- 物理设计:
- 机架标准: 水平方向, 通常高度为1U至4U (1.75 到 7 英寸), 和 19 英寸宽. 设计用于由架子内的导轨支撑.
- 塔: 垂直方向, 设计为自由站立.
- 安装:
- 机架标准: 需要一个带有可用U空间和兼容铁轨套件的设备架. 安装可能更多,因为轨道符合轨道并将单元抬起/将设备抬起 (经常很重).
- 塔: 简单的物理安装 - 只需将其放置在需要的地方 (考虑通风) 并将其插入.
- 最好的用例:
- 机架标准: 服务器室的理想, 网络壁橱, 架子, 或IT设备已经合并到机架中的任何环境. 节省地板空间并整齐地集成.
- 塔: 最适合保护单个工作站的, 桌面设置, 销售点系统, 或小型独立服务器和未安装架的网络设备.
- 空间效率: 机架标准单元在已经使用架子的环境中高度太高,因为它们使用现有的垂直空间. 塔楼将占用地板或桌子空间.
- 冷却 & 空气流动: Rack -Mount UPS单元设计了气流图案 (通常是前到后的或一侧) 与服务器机架的冷却策略兼容. 塔架通常从前面吸取空气,然后排出后面.
- 特征: 两者都可以提供类似的电气保护功能 (avr, 正弦波输出, 电池备用时间取决于负载和电池容量). 然而, 针对IT环境的Rack -Mount UPS单元可能会更一致地提供高级功能,例如网络管理卡, 环境传感器支持, 和可热门的电池.
- 可转换UPS模型: 一些 UPS1. 单位是“可转换的," 意思是它们可以用于塔式方向或, 带有包含或可选的铁路套件,有时还旋转显示面板, 安装在架子上. 如果您的需求可能会改变,则可以提供灵活性.
GYCX太阳能反射: “对于我们的GYCX太阳能客户, 如果他们很小, 其太阳能和电池系统的机架已安装数据记录仪或通信网关, 紧凑的机架UPS非常适合确保重要的链接保持动力. 如果只是一台台式计算机监视系统, 塔UPS通常更简单,更具成本效益。"
关键是将UPS形式与设备环境相匹配.
正确安装机架式UPS对于您的设备和人员的安全至关重要, 以及UPS本身的寿命和绩效. 通过了解机架标准, 计划您的布局, 确保您的机架被牢固地锚定, 并仔细遵循特定UPS模型的安装步骤, 您可以创建可靠且专业的功能保护设置.
而GYCX太阳能的专业知识在于太阳能系统和大规模电池存储, 我们知道,安全设备安装的原理是通用的. 如果您要为能源系统集成了关键的监视或控制组件,并且对其设置的最佳实践有疑问, 随时接触我们知识渊博的团队.
了解UPS一词, 与光伏储能有关, 为了更好地比较和理解光伏储能系统的操作概念. 这将帮助您选择更适合您需求的产品. ↩